Showing posts with label sheet. Show all posts

Monday, April 21, 2014

The Making of a Cue Sheet, Feedback

The post on how to create a cue sheet generated some feedback, some of which I'd like to share with you.

First, from Susan Otcenas:
"Had a conversation about cue sheets with some Canadian and US riders. One small item they seemed to feel differently about from your procedure. General consensus was that they want cue sheets to read left to right. As in Proceed 0.1 miles to mile 159 and turn right at River Rd."

So I thought about it, and modified my copy of cue sheet for the upcoming brevet.  Now, for ME, the most important thing on the cue sheet is total distance, because that is what is displayed on my bike computer as well!  Given that, I had the leg distance first, but in a slightly smaller font, and the total distance boldface font, same font size as everything else.  That way, I could quickly focus on total distance.  Looked like this:

Leg distance given first
Worked out well, so I will carry this format forward

Additionally, from Mark Thomas:
"FYI. I've had pretty good luck with a slight variation of this method. I put additional information (like your 10a stuff) into the cue sheet entries in RwGPS. It ends up in the same place after you do the CSV export / open in Excel, but then you have the information available in the RwGPS file as well."

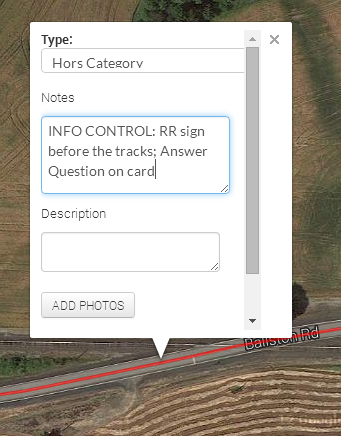
The way to do this is to select the Add to Cuesheet option over on the right side, then click on the route where you want the control.  Then type in any information you want for the cues sheet CSV export.
Add to Cuesheet dialog box

Your notes added to the cues for the route, plus the mileage; nice!
When you export, there it is:
Already in your preliminary cuesheet
The only drawback I see to this is that the cues you add to the route do not show up as icons on the route map.  You would still need to add a POI (Point of Interest) for the viewer to see them called out on the map.

(Updated after more feedback from Mark) As well as adding cues for controls, this also works for useful bits of information such as summits, dangerous railroad tracks, or other.  In addition, existing cues can be improved with clearer navigation information, and adding SS and/or T (stop sign, t-intersection) or any other useful navigational aids.  And this is all stored in the RWGPS file, so you don't have to re-add it should you need to regenerate the cue sheet, and others have access to the information from the RWGPS link.

Monday, April 14, 2014

The Making of a Cue Sheet

Update: I received feedback on this, and ended up with an even more usable cue sheet layout.  So read this for the study and conclusions, and then read this posting for my preferred cue sheet layout.

About 5 years ago, I did a survey on what riders considered the most usable cue sheet format.

Basically, the most important bits of information were:

  • Turn
  • Road (description)
  • Cumulative distance, and
  • Leg distance

Everything else was less important, and, indeed in some respondents' eyes, "too much information".  That can be interpreted as distraction, or hiding the important information in too much text and numbers.

Not to mention that the cue sheet should be accurate!

Note: it is considerably harder to describe this process than to actually do it.

My process to generate a cue sheet for randonneuring is as follows:

Prerequisites: working knowledge of Excel or similar spreadsheet program

1) at least have ridden on the roads in question.  Mostly.  Or gather information from those who have.

2) map it out in Ride With GPS.  I like this mapping program best.  It is free, uses Google Maps data (which seemingly the entire world is buying into), and generates a wonderful starting point for the cue sheet.  I also find it easiest to use of all the programs out there.  I like it so much that I have calibrated my bike computer to match up with it.  If there is going to be a One True Distance, might as well be the one most people use and have easy access to. Yes, I know there are many truths, but if my bike computer and the cue sheet agree, that is a truth I buy into.

3) Verify that map.  Sometimes little side turns sneak in when plotting.  Edit them out (drag the route). Make sure the distance is what it needs to be.  Sucks to have to find a couple hundredths of a mile to get the route to the required distance later on.

4) Save the route, then export it to .csv format.  Looks like this:

Ride With GPS .csv output

5) The distance is way over on the right, so I move that column to be the first column. 

6) Best now to make a copy of this worksheet, so you will have the original handy.  Delete the elevations column if you don't want them.

7) Now, go through that cue sheet with the map handy, and tidy it up.  There will be extra turns in the original that don't apply in real life; delete them.  In addition, maybe a turn is missing, because the plotting program didn't think it needed to be included.  Also verify that all the rights and lefts are correct.  Save your file :-)

8) Now, remove all the extraneous text.  I make use of the Excel Replace All function, doing things like replacing "Turn right onto " with nothing, and so on.  Actually, I got tired of doing it over and over, and created a macro* to do it all for me.  After I clean up all the descriptions, I then replace all the "Right" with "R", "Left" with "L" and "Straight" with "CS".  After all that, I scan through the cue sheet again, manually fixing the ones that weren't zapped by the macro.
  • Don't forget to include the trailing space when replacing the text!
The Excel CTRL-H function.  Removing the trailing space makes the cue sheet look nicer.
9) Starting to look like a usable cue sheet!

10) Put in all the controls.  For controls where the rider just stops along the route and continues, I preface them in the Turn column with Stop.  If they are to turn around and go back, the Turn column contains "U" (U-turn).  You can find the exact mileage for the control, if it isn't at a turn, by putting your cursor on the exact spot on the map, and seeing the distance readout below in the elevation graph.
  • If you need to add a row, use the "Insert Row" function in Excel.  Newer versions let you choose to add a row above or below the currently selected row.
  • Tell the rider what to do AFTER the control.
10a) Add in useful information, like what town the location is in, and where convenience stores, food places, and groceries are located.  Also things like SS (stop sign), SL/TL (stop/traffic light), T (T intersection), are really nice; gives the rider another hint about the turn.
  • ex: "Netarts, groceries, taco truck, 3 Capes CafĂ©, Schooner Inn".  I italicize information that is useful, but not needed for route navigation
  • If a road changes names, I put that on a single line if there are no turns: "Bridge St, bc NE Abbey Rd"
11) now that you know the distance for all your controls (I work in miles; others choose to start in km), you can get the control times from the proper RUSA calculator.  RUSA certified events have different time windows than ACP certified events...
  • ex: "OPEN CONTROL: Tillamook, Main St (US 101)    Open/Close (8:44/12:12)"
12) are you happy with the cue sheet?  All turns correct?  Controls added?  Time to add the intermediate distances (legs), distance in the other (km or mi) reckoning, and format it!

13) insert a column between the total distance and the turn.  This is your Leg column.  The convention here is to have the Leg distance be how far one has to go before the turn (yeah, weird, but we are used to it), so, the entry in the row is the total distance in that row minus the total distance in the previous row.  You could just as easily do it the other way, next row minus this row.  But make sure everyone understands what is going on, although a quick glance at the cue sheet would make that clear.  So, do the formula and fill the column with that formula.  If there is a total distance in every row in the Total Distance column, all will be good.  If not, there will some funny numbers, so please go through and verify.  Save the file.
  • Leg formula, assuming Column A is Total Distance and Column B is Leg Distance, filling in row 3: "=A3-A2".  Copying this down will make the correct formula for each row.
  • Why I start with Total Distance and calculate Leg Distance - the imprecision of each Leg Distance will lead to Total Distance inaccuracies which compound through the cue sheet.  Using Ride With GPS, I can always find the total distance at any point, if things change.
14) now for the other distance reckoning.  I put those over on the right side.  Too many columns of numbers all clustered together is a recipe for a rider to read the wrong one at night when they are tired.  Make two columns, Km and Leg.
  • Total Km formula is: Miles*1.609344
  • Leg Km formula is the Leg Miles *1.609344
Again, create the first formulas, then drag down to fill the columns.

15) Formatting.  I understand some of this is regional preference, but this is how I do it:
  • Now is the time to reduce the number of digits to the right of the decimal point to just one.  Excel has a handy little control to do just that.  Note that this changes the DISPLAY FORMAT of the number, but not the underlying value.  This is a good thing.

    Reducing displayed decimal places
  • Font is something easy to read, Arial, Calibri.  NOT Times New Roman or Comic Sans!
  • Starting font size is 11, but I always save my cue sheets such that riders can download and edit them for their preferences.  Like bigger font :-) if they need it.
  • Control rows are boldface text and yellow background
  • The Turn column is centered and boldface text
  • The Total Distance column is sometimes boldface text.  I am liking that and will probably adopt it.
  • Borders - the outside borders and the horizontal (row) borders are black.  The internal vertical (column) borders are Darker 35% Gray.  Subtle, but the eye will track across a single row better, if some divisions are less emphasized.
  • All those useful bits, like a legend to the abbreviations, and who to call if you abandon should be added at the bottom.
  • Legend I use: L (left), R (right), CS (continue straight), VL/VR (veer left/right), X (cross), U (u-turn), Stop (stop), Immed (Immediate, like Immediate L or R)
  • Most of us use the front bags with map holder, which fits 8.5" width paper, so I don't do anything special, except to ensure that the cue sheet will fit to 8.5" printout.
16) Save it.  Now, follow it on the map one more time.  With any luck, you are all there, and can relax.  Or submit the route to the appropriate group for approval.

17) an option:  Remember "green bar" paper?  Easier to track across a line.  For my own use, I "green bar" my cue sheets, using the Excel table formatting function, with a very light green background on alternating lines.
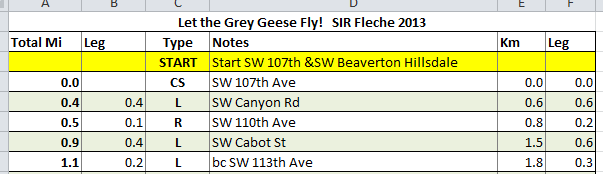
Green Bar formatting

*macro - basically a recording of what you have done.  Start recording, go through all the Replace Alls, then stop it and save it.  You have to have "Developer" enabled in Excel, and you can find out how to do that online.  Out of scope for this posting.

Acknowledgement: my cue sheet formatting is based largely on the style developed by Susan France, Oregon Randonneurs RBA, with some additions.

Sunday, April 6, 2014

Technical Aside: Calibrating The Bike Computer Mathematically

Following a cue sheet depends somewhat on a reasonably accurate bike computer, especially in urban areas, where all one seems to do is turn every block.  A reasonably accurate bike computer ALSO means you don't have to wonder where the next town is, when you've already ridden further than the leg distance indicates!

I mean, yeah, you can figure out the difference between your computer and the cue sheet at the next turn and spend the rest of the ride doing math, but...

There are the tried and true methods of 1) using the tire measurement that came in the instructions with your bike computer (usually in 2 point font), and 2) the rollout method.

As I use a less common tire size, my purported tire dimension is never in the instructions.  And the rollout method wants one to ride in a straight line, involves chalk, and a measuring tape to measure in mm.  Can you imagine the inaccuracy that comes from that?

I am lazy.  Why do that when the awesome power of mathematics and spreadsheets are at my command?  Plus, so many cue sheets are generated from online mapping programs (Ride With GPS, Bike Route Toaster, etc), that I would really prefer that my computer match their distances.

Process is as follows:
Go for a bike ride.  The longer, the better.
Map that exact same route out on your preferred mapping program.  I recommend Ride With GPS.

You need to start with a couple of numbers:
1) your bike computer readout from your ride
2) the mapped distance for that ride
3) your current bike computer wheel circumference setting.  Mine is in mm.

First, solve for the number of rotations your wheel made on the ride.  Everything has to be in the same units, in this case, mm.  The formula below converts the bike computer distance in miles, to mm.  If your bike computer reads out in km, well, you'd just add 6 zeros :-)

rotations = (bike computer readout*1609344)/current wheel circumference

The 1609344 is mm in a mile.  If you were solving for cm, you would use 160934.4

You really want to do it with a spreadsheet, to preserve the precision through the calculations.  Of course, I remember doing similar calculations in HS Chemistry, with nothing but a Post Versalog slide rule.  Spreadsheets are better.

Now, the number of rotations will not change for the same distance, so, with the value of rotations firmly in hand, we can now solve for the desired wheel circumference:

desired circumference = (mapped distance*1609344)/rotations

Now the hard part for some, plugging the new circumference value back into your bike computer.

On your next ride, again check the bike computer readout against the online mapped distance.  You might need to adjust, but you will be much closer.

Quicker, alternative method, suggested by my husband:
desired circumference = current circumference*(mapped distance/bike computer distance)

I ran it both ways; the results were within a millimeter.

Monday, May 4, 2009

Cue Sheet Survey Results and Recommendations

Thank you to everyone who participated in the Cue Sheet Format Survey. 66 of you filled out the survey, more than enough for statistical significance. And so...

Participants

The survey was publicized in the Portland Velo club forums, the Oregon Randonneurs mail list, the Cascade Bike Club forums, and this blog.

Cue Sheet Use Context

Participant ride categories:
  • Club rides 59.1%
  • Event rides 80.3%
  • Randonneuring rides 43.9%
  • Rides with friends 24.2%

The distribution of results changed markedly as the Event Ride participation number went up. In retrospect, there should have been one more question regarding actual usage of the cue sheet - on event rides the route is usually well marked, there are many cyclists, and generally no actual need to look at the cue sheet!

Carrying the cue sheet:
  • folded in a sandwich-sized bag 36.4%
  • clipped to the handlebar 27.3%
  • map window in a handlebar bag 13.6%
  • map holder attached to the handlebar 13.6%
  • in pocket or under the leg of the shorts 60%
  • other 15.2%

The sandwich-sized plastic bag (Ziploc TM) is 6.5" wide and 5.5" high. Of the 10 other data points offered, 5" high and either 4" or 8" wide were most common. However, this represents a small percentage of the data. I will tentatively conclude that the most common map carrier size is the sandwich-sized plastic bag, which is often clipped to the handlebar, stuffed in a pocket, bag, or under the leg of one's riding shorts.

Less than 20% of riders use a GPS unit.

68% of the riders ride in the dark. This has further implications for readability of the cue sheet.

Route Information Most Wanted

The following items were rated most important to be included on a cue sheet (in order)
  • turn 88%
  • road or location description 83.5%
  • cumulative distance 40.8%
  • leg distance 36.4%
The following items were rated as unneeded:
  • latitude and longitude 83.5%
  • distances in both miles and km 80.9%
  • compass degrees 83.9%
  • compass points 60.8%
Elevations and overall route map were both rated as nice to have.

Presentation of Route Information

An overwhelming 76% prefer the turn information as simple abbreviations: R, L, X, VR, VL, etc. 21% are ok with spelling it out, and 3.1% prefer the additional word "Turn".

For general overall cue sheet formatting the following is preferred:
  • All components in separate columns 62.9%, 79% if the Preferred and Required responses are combined
  • Turns in boldface are preferred
  • Street names in boldface are nice to have
  • Each cue line clearly delineated 62.5%, 86% if Preferred and Required responses are combined
  • Easily readable and sufficiently sized font 97% Preferred and Required
  • Cue sheet can be folded to fit my map holder with no loss of information, 81% Preferred and Required.

Preferences on mixed case vs all caps were inconclusive. Many other studies show that text recognition is faster when the text is in mixed case; I'd recommend that.

Themes from the verbatims

35 participants provided additional comments. Themes that emerged were:
  • big enough font for those with reading issues. (Lynne: Note that this is ALSO an issue for reading cue sheets at night)
  • More complete descriptions - landmarks, nice views, "T" intersections, places to eat
  • Cue sheet should fold to 1/4 size of standard sheet of paper and have all needed info viewable; it's ok to have the text in the description field wrap.
  • Excel format and editable
  • Use color or lines to delineate each cue
Recommendations

"Enough information, but not *too much* information." - participant verbatim

Minimum content
  • cumulative distance, turn information, leg distance, and description.
  • Overall map and elevations are nice.
  • Consider providing the map in an editable format for those who have particular formatting preferences

Presentation
  • Format the content such that the paper can be folded into quarters and put into a sandwich bag with no loss of information
  • Preferably, format each content component into its own column
  • Describe the turns as R, L, BR, BL, VR, VL, X, etc. Don't spell them out, unless they are embedded in the description. Don't add extra words. If you want to say "Turn" use it as a column header
  • Clearly delineate each cue line
  • Distinctively format Rest Stops and Controls - color, all caps, bold, bigger font. Make sure the additional formatting does not reduce contrast between the text and the background
  • Note "T" intersections. Less worrying about missing the turn with that bit of info
  • Arrange content in a logical "sentence" order - At Mile X Turn R, Turn Description, And Go Y
Some prototypes, one with just miles, one additionally with km. Either the miles or km can be folded under, with no loss of information and a logical flow to the presentation.

Prototypical Cue Sheet Miles

Prototypical Cue Sheet Miles and KM
(CLICK THIS ONE TO SEE THE WHOLE PICTURE!)

Monday, April 20, 2009

A Survey of Cue Sheet Formats

I never throw away a cue sheet. I've got stacks of them, dating back to when they were painstakingly typed, or indeed, hand-drawn.

Another Rando Cue Sheet

That said, I find that some formats work better for me than others. I'd like to find out which combinations of route components and formatting work for you.

I've got a collection of cue sheet samples for viewing here
Cue Sheet Samples

And a 10 question survey
Click Here to take survey

So, if you resemble the demographic (cyclist who rides with cue sheets), join in!