Update: I received feedback on this, and ended up with an even more usable cue sheet layout. So read this for the study and conclusions, and then
read this posting for my preferred cue sheet layout.
About 5 years ago, I
did a survey on what riders considered the most usable cue sheet format.
Basically, the most important bits of information were:
- Turn
- Road (description)
- Cumulative distance, and
- Leg distance
Everything else was less important, and, indeed in some respondents' eyes, "too much information". That can be interpreted as distraction, or hiding the important information in too much text and numbers.
Not to mention that the cue sheet should be accurate!
Note: it is
considerably harder to describe this process than to actually do it.
My process to generate a cue sheet for randonneuring is as follows:
Prerequisites: working knowledge of Excel or similar spreadsheet program
1) at least have ridden on the roads in question. Mostly. Or gather information from those who have.
2) map it out in
Ride With GPS. I like this mapping program best. It is free, uses Google Maps data (which seemingly the entire world is buying into), and generates a wonderful starting point for the cue sheet. I also find it easiest to use of all the programs out there. I like it so much that I have
calibrated my bike computer to match up with it. If there is going to be a One True Distance, might as well be the one most people use and have easy access to. Yes, I know there are many truths, but if my bike computer and the cue sheet agree, that is a truth I buy into.
3) Verify that map. Sometimes little side turns sneak in when plotting. Edit them out (drag the route). Make sure the distance is what it needs to be. Sucks to have to find a couple hundredths of a mile to get the route to the required distance later on.
4) Save the route, then export it to .csv format. Looks like this:
 |
| Ride With GPS .csv output |
5) The distance is way over on the right, so I move that column to be the first column.
6) Best now to make a copy of this worksheet, so you will have the original handy. Delete the elevations column if you don't want them.
7) Now, go through that cue sheet with the map handy, and tidy it up. There will be extra turns in the original that don't apply in real life; delete them. In addition, maybe a turn is missing, because the plotting program didn't think it needed to be included. Also verify that all the rights and lefts are correct. Save your file :-)
8) Now, remove all the extraneous text. I make use of the Excel Replace All function, doing things like replacing "Turn right onto " with nothing, and so on. Actually, I got tired of doing it over and over, and created a macro* to do it all for me. After I clean up all the descriptions, I then replace all the "Right" with "R", "Left" with "L" and "Straight" with "CS". After all that, I scan through the cue sheet again, manually fixing the ones that weren't zapped by the macro.
- Don't forget to include the trailing space when replacing the text!
 |
| The Excel CTRL-H function. Removing the trailing space makes the cue sheet look nicer. |
9) Starting to look like a usable cue sheet!
10) Put in all the controls. For controls where the rider just stops along the route and continues, I preface them in the Turn column with Stop. If they are to turn around and go back, the Turn column contains "U" (U-turn). You can find the exact mileage for the control, if it isn't at a turn, by putting your cursor on the exact spot on the map, and seeing the distance readout below in the elevation graph.
- If you need to add a row, use the "Insert Row" function in Excel. Newer versions let you choose to add a row above or below the currently selected row.
- Tell the rider what to do AFTER the control.
10a) Add in useful information, like what town the location is in, and where convenience stores, food places, and groceries are located. Also things like SS (stop sign), SL/TL (stop/traffic light), T (T intersection), are really nice; gives the rider another hint about the turn.
- ex: "Netarts, groceries, taco truck, 3 Capes Café, Schooner Inn". I italicize information that is useful, but not needed for route navigation
- If a road changes names, I put that on a single line if there are no turns: "Bridge St, bc NE Abbey Rd"
11) now that you know the distance for all your controls (I work in miles; others choose to start in km), you can get the control times from the proper RUSA calculator. RUSA certified events have different time windows than ACP certified events...
- ex: "OPEN CONTROL: Tillamook, Main St (US 101) Open/Close (8:44/12:12)"
12) are you happy with the cue sheet? All turns correct? Controls added? Time to add the intermediate distances (legs), distance in the other (km or mi) reckoning, and format it!
13) insert a column between the total distance and the turn. This is your Leg column. The convention here is to have the Leg distance be how far one has to go before the turn (yeah, weird, but we are used to it), so, the entry in the row is the total distance in that row minus the total distance in the previous row. You could just as easily do it the other way, next row minus this row. But make sure everyone understands what is going on, although a quick glance at the cue sheet would make that clear. So, do the formula and fill the column with that formula. If there is a total distance in every row in the Total Distance column, all will be good. If not, there will some funny numbers, so please go through and verify. Save the file.
- Leg formula, assuming Column A is Total Distance and Column B is Leg Distance, filling in row 3: "=A3-A2". Copying this down will make the correct formula for each row.
- Why I start with Total Distance and calculate Leg Distance - the imprecision of each Leg Distance will lead to Total Distance inaccuracies which compound through the cue sheet. Using Ride With GPS, I can always find the total distance at any point, if things change.
14) now for the other distance reckoning. I put those over on the right side. Too many columns of numbers all clustered together is a recipe for a rider to read the wrong one at night when they are tired. Make two columns, Km and Leg.
- Total Km formula is: Miles*1.609344
- Leg Km formula is the Leg Miles *1.609344
Again, create the first formulas, then drag down to fill the columns.
15) Formatting. I understand some of this is regional preference, but this is how I do it:
- Now is the time to reduce the number of digits to the right of the decimal point to just one. Excel has a handy little control to do just that. Note that this changes the DISPLAY FORMAT of the number, but not the underlying value. This is a good thing.
 |
| Reducing displayed decimal places |
- Font is something easy to read, Arial, Calibri. NOT Times New Roman or Comic Sans!
- Starting font size is 11, but I always save my cue sheets such that riders can download and edit them for their preferences. Like bigger font :-) if they need it.
- Control rows are boldface text and yellow background
- The Turn column is centered and boldface text
- The Total Distance column is sometimes boldface text. I am liking that and will probably adopt it.
- Borders - the outside borders and the horizontal (row) borders are black. The internal vertical (column) borders are Darker 35% Gray. Subtle, but the eye will track across a single row better, if some divisions are less emphasized.
- All those useful bits, like a legend to the abbreviations, and who to call if you abandon should be added at the bottom.
- Legend I use: L (left), R (right), CS (continue straight), VL/VR (veer left/right), X (cross), U (u-turn), Stop (stop), Immed (Immediate, like Immediate L or R)
- Most of us use the front bags with map holder, which fits 8.5" width paper, so I don't do anything special, except to ensure that the cue sheet will fit to 8.5" printout.
16) Save it. Now, follow it on the map one more time. With any luck, you are all there, and can relax. Or submit the route to the appropriate group for approval.
17) an option: Remember "green bar" paper? Easier to track across a line. For my own use, I "green bar" my cue sheets, using the Excel table formatting function, with a very light green background on alternating lines.
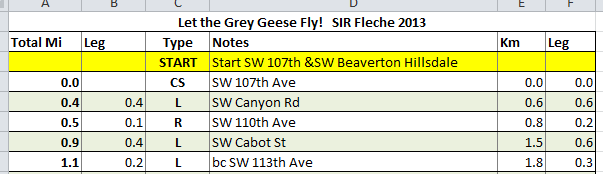 |
| Green Bar formatting |
*macro - basically a recording of what you have done. Start recording, go through all the Replace Alls, then stop it and save it. You have to have "Developer" enabled in Excel, and you can find out how to do that online. Out of scope for this posting.
Acknowledgement: my cue sheet formatting is based largely on the style developed by Susan France, Oregon Randonneurs RBA, with some additions.